
VoxForge

VoxForge
If you forget your password, you can get a new one e-mailed to you by performing the following step:s
$ sudo apt install default-jdk
no longer works.
You can us javaws to download the .jnlp file and run it locally from the command line:
$ javaws http://read.voxforge1.org/speech/SpeechSubmission.jnlp
-or-
download the .jnlp file to your computer first, and then run it locally:
$ wget http://read.voxforge1.org/speech/SpeechSubmission.jnlp
$ javaws SpeechSubmission.jnlp
Download the jar file directly from command line (which is what .jnlp does from the browser...) and run java against the jar:
$ wget http://read.voxforge1.org/speech/speechrecorder_standalone.jar
$ java -jar speechrecorder_standalone.jar
From this thread: For Noisy Input
For a recognition result like this:
### read waveform input
Stat: adin_file: input speechfile: seven.wav
STAT: 12447 samples (1.56 sec.)
STAT: ### speech analysis (waveform -> MFCC)
### Recognition: 1st pass (LR beam)
............................................................................pass1_best: <s> 5
pass1_best_wordseq: 0 2
pass1_best_phonemeseq: sil | f ay v
pass1_best_score: -1867.966309
### Recognition: 2nd pass (RL heuristic best-first)
STAT: 00 _default: 120 generated, 120 pushed, 14 nodes popped in 76
sentence1: <s> 5 </s>
wseq1: 0 2 1
phseq1: sil | f ay v | sil
cmscore1: 1.000 0.316 1.000
score1: -1944.799561
(tpavelka's post): Julius outputs two types of scores:
The Viterbi score, e.g.:
score1: -1944.799561
This is the cummulative score of the most likeli HMM path. The Viterbi algorithm (decoder) is just a graph search which compares scores of all possible paths through the HMM and outputs the best one. The problem is, that a score of a path (sentence) depends on the sound files length but also on the sound file itself (see this thread for more discussion). This means that Viterbi scores for different files are not comparable. I understand that you want some kind of measure, which can tell you something about whether the result found by Julius is believable or not. In that case, have a look at
The confidence score, in your example:
cmscore1: 1.000 0.316 1.000
Julius outputs a separate score for each word, so in your example the starting silence has confidence score of 1.0 (i.e. 100%), the word "five" has the score 0.316 (i.e. not that reliable) and the ending silence has again 1.0.
Popular language modeling tools are:
VoxForge uses Public Domain Audio Books (LibriVox) recordings to create a derivative works which will be licensed under the GPL (with all applicable rights held by the Free Software Foundation).
This will not affect the legal status of the recording you submitted here or anywhere else (e.g. LibriVox). Therefore you will still be able to put your recording into the public domain (or it will remain in the public domain if it's already in there).
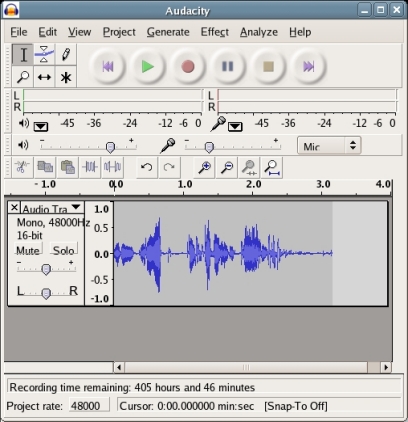
First make sure your microphone volume in Audacity is set to 1.0. Then click Record (i.e. the red circle button) and begin speaking in your normal voice for a few seconds, and then click Stop (i.e. the yellow square button).
Look at the Waveform Display for the audio track you just created (see image below). The Vertical Ruler to the left of the Waveform Display provides your with a guide to the audio levels. Try to keep your recording levels between 0.5 and -0.5, averaging around 0.3 to -0.3. It is OK to have a few spikes go outside the 0.5 to -0.5 range, but avoid having any go beyond the 1.0 to -1.0 range, as this will generate distortion (see image):
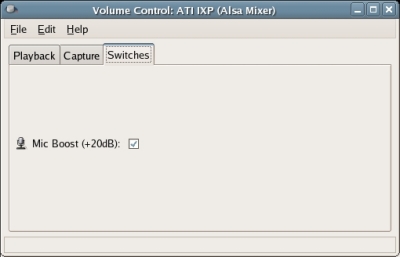
If you have increased your volume to the maximum and still are not getting an acceptable sound level, you may need to turn on the 'Mic Boost' switch in your Linux mixer. Fedora's mixer (i.e. gnome-volume-control) is the "Volume Control" utility located in Applications>Sound & Video>Volume Control menu. Select the 'Switches' tab of the Volume Control utility and then select 'Mic Boost (+20dB)' (see image below):
Note: Audacity's microphone volume control overrides any other microphone volume settings you may have in your Linux mixer (i.e. in the Capture tab).
Hit the ctrl-z key in Audacity (to 'undo' your previous recording) and try recording again.
If the waveform display on your track beyond the 1.0 to -1.0 range (i.e. the waveforms have been clipped off at the top or bottom) your volume is too high. Reduce it with Audacity's microphone volume control, and hit ctrl-z in Audacity and try again. It is better to err on the side of having a lower volume level from a speech recognition perspective - clipped speech sounds distorted.
Once you are satisfied that the volume is acceptable, try playing the file back by clicking Play (i.e. the green triangle button) in Audacity. You will likely need to adjust the Master Volume and the PCM Volume sliders for your speakers under the 'Playback' tab in your Volume Control utility, see image:
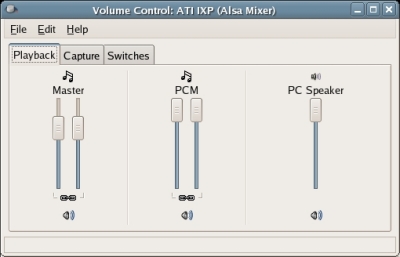
Note: Your Audacity Volume control slider and your mixer's PCM Volume Control slider move in tandem - i.e. moving one will move the other. But you may still need to adjust your Master Volume control in your mixer to hear sound from your speakers.
You need to hear your utterances after each recording to make sure they sound OK - but make sure that your speakers are turned off when you are recording. Hit ctrl-z in Audacity to remove the track you just created.
Please create a single compressed tar file containing the following files:
Name your tar file as follows "[voxforge username]-[year][month][day].tgz" . For example, if you stored all these files in the /home/myusername/train folder, you would execute the following command to create your gzipped tar file:
|
$cd /home/myusername |
To set your microphone volume in Linux, you need use your distro's mixer. To start the Gnome mixer, select:
System>Preferences>Volume Control
and then click the Capture tab: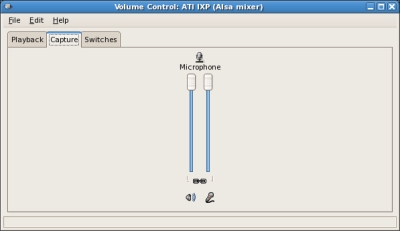
Move the sliders up or down to increase or decrease your microphone's recording volume.
First make sure your microphone slider is set to it's mid-point. Then click Record in the VoxForge Speech Submission Application and begin speaking in your normal voice for a few seconds, and then click Stop.
Look at the Waveform Display for the recording you just created. Adjust your microphone volume up or down depending on the size of the Waveforms.
If you have
increased your volume to the maximum and still are not getting an
acceptable sound level, you may need to either increase the volume
settings or turn on the 'Mic Boost' switch in your Linux mixer. Select
the 'Switches' tab of the Volume Control utility and then select 'Mic
Boost (+20dB)' (see image below):
Try re-recording some speech - you might have to reduce your microphone volume to compensate for the Mic Boost.
If the waveforms in the display have been clipped off at the top or bottom, then your volume is too high. Reduce your microphone volume, and re-record some speech. It is better to err on the side of having a lower volume level from a speech recognition perspective - clipped speech sounds distorted. But you also need it to be loud enough such that you can see your speech waveforms in the display (i.e. you should be able to see squiggly lines that correspond to your speech).
Once
you are satisfied that the volume is acceptable, try playing the file
back by clicking Play . You will likely need to adjust the Master
Volume and the PCM Volume sliders for your speakers in your Volume
Control utility, see image:
To set your microphone volume using Linux, you need use your
distro's mixer. To start the KDE mixer (which is included with the
"kdemultimedia" package), select:
System>Multimedia>KMix
and then click the Input tab: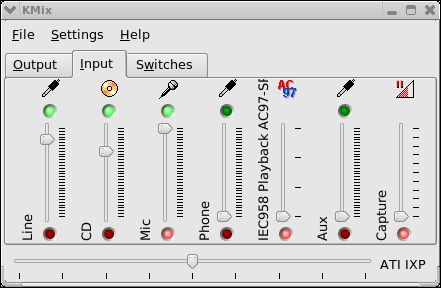
Move the "Mic" slider up or down to increase or decrease your microphone's recording volume.
First make sure your microphone slider is set to it's mid-point. Then click Record in the VoxForge Speech Submission Application and begin speaking in your normal voice for a few seconds, and then click Stop.
Look at the Waveform Display for the recording you just created. Adjust your microphone volume up or down depending on the size of the Waveforms.
If you have
increased your volume to the maximum and still are not getting an
acceptable sound level, you may need to either increase the volume
settings or turn on the 'Mic Boost' switch in your Linux mixer. Select
the 'Switches' tab of the KMix utility and then select 'Mic
Boost (+20dB)' (see image below):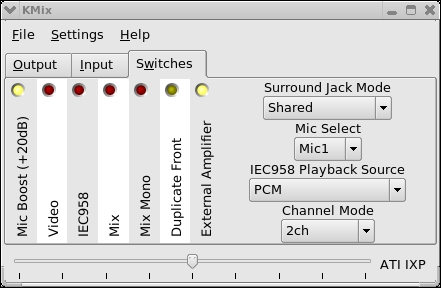
Try re-recording some speech - you might have to reduce your microphone volume to compensate for the Mic Boost.
If the waveforms in the display have been clipped off at the top or bottom, then your volume is too high. Reduce your microphone volume, and re-record some speech. It is better to err on the side of having a lower volume level from a speech recognition perspective - clipped speech sounds distorted. But you also need it to be loud enough such that you can see your speech waveforms in the display (i.e. you should be able to see "squiggly" lines that correspond to your speech).
Once you are satisfied that the volume is acceptable, try playing the file back by clicking Play. You might need to adjust the Master Volume and the PCM Volume sliders for your speakers in under the KMix "Output" tab.
VoxForge collects speech audio at the highest Sample Rate that your Sound Card can support (up to a Sampling Rate of 48kHz, at 16 Bits Per Sample). You'll need to look at your Sound Card's manual to determine the maximum it supports (see this FAQ entry for more info on your sound card and recording rates). For this example we will assume a 48kHz Sample Rate.
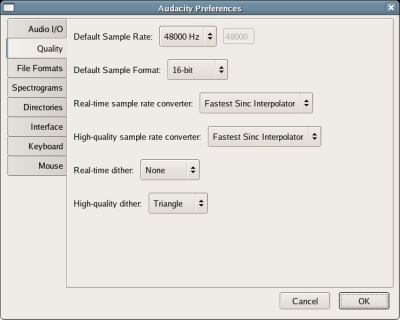
In Audacity, you set the Project Sampling Rate in your Preferences. First go to 'File', then select 'Preferences...', next click the 'Quality' tab, and then set your 'Default Sample Rate Format' by clicking the up/down arrows to change it to 48000Hz (the default is usually 44100Hz), see image below:
Still in the 'Preferences...' menu, and still under the 'Quality' tab,
click the 'Default Sample Format'. Click the up/down arrows
to change it to 16-bit, see image above.
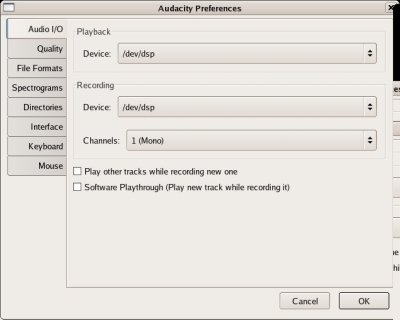
While still in the 'Preferences...' menu, click the 'Audio I/O' tab, and then set your 'Channels' to 1 (Mono), see image below:
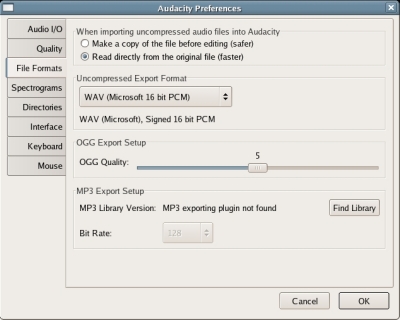
While still in the 'Preferences...' menu, click the 'File Formats' tab, and then set your 'Uncompressed Export Format' to WAV (Microsoft 16 bit PCM), see image below:
You can also submit speech using FLAC format.
| Note: Please only submit audio files in an uncompressed format such as WAV or AIFF or lossless compressed format such as FLAC. |
Click OK to save your settings.
Now you need to exit and re-start Audacity to make these Project Setting changes active. In Audacity, click File>Exit. Restart Audacity by clicking Applications>Sound & Video>Audacity.
Look at Project rate selector on the bottom left hand corner of the Audacity window, make sure it says 48000. If it does, then you are ready to continue. If not, then re-check your Preferences tab to make sure your settings are correct.
To submit audio to VoxForge, you need to make sure you Sound Card and your Device driver both support a 48kHz sampling at 16 bits per sample.
You can use arecord, the command-line sound recorder (and player) for the ALSA
sound-card driver. It should be included with your Linux
distribution (type in "man arecord" at the command line to confirm
this).
The approach here is use the 'arecord' command to try to record your speech at a sampling rate higher than what your sound card supports. arecord balks at this and will return an error message stating the maximum rate your sound card or usb mic can give you. Details of this approach can be found near the end of this thread (go to the second page). Many thanks to Robin for helping out on this one.
1. Sound Card or Integrated Audio
If you have a sound card or audio processing integrated into your motherboard, get a list of all the audio devices on your PC by executing this command:
$arecord --list-devices
You should get output similar to this:
**** List of CAPTURE Hardware Devices ****
card 0: IXP [ATI IXP], device 0: ATI IXP AC97 [ATI IXP AC97]
Subdevices: 1/1
Subdevice #0: subdevice #0
This says that my integrated audio card is on card 0, device 0.
Next, try to record your speech at a rate higher than what you think your highest recording rate might be (replacing the numbers in hw:0,0 with your card and device number):
$ arecord -f dat -r 60000 -D hw:0,0 -d 5 test.wav
The 60000 corresponds to a sampling rate of 60kHz. Your output should look something like this:
Recording WAVE 'test.wav' : Signed 16 bit Little Endian, Rate 60000 Hz, Stereo
Warning: rate is not accurate (requested = 60000Hz, got = 48000Hz)
please, try the plug plugin (-Dplug:hw:0,0)
Aborted by signal Interrupt...
This tells us that the maximum sampling rate supported on my integrated audio card is 48000Hz (or 48kHz). You may have to experiment with different sampling rates to get the Warning message.
2. USB Microphone or USB audio pod
If you have USB based audio, first get a list of all the audio devices on your PC using this command:
$ arecord --list-devices
You should get a listing similar to this:
[...]
card 1: default [Samson C01U              ], device 0: USB Audio [USB Audio]
      Subdevices: 1/1
      Subdevice #0: subdevice #0
This says that the USB microphone is is on card 1, device 0.
Next, try to record your speech at a rate higher than what you think your highest recording rate might be (replacing the numbers in hw:1,0 with your card and device number):
$ arecord -f S16_LE -r 60000 -D hw:1,0 -d 5 testS16_LE.wav
"S16_LE" means 'Signed 16 bit Little Endian'. This command will output something like this:
Recording WAVE 'test.wav' : Signed 16 bit Little Endian, Rate 60000 Hz, Stereo
Warning: rate is not accurate (requested = 60000Hz, got = 48000Hz)
please, try the plug plugin (-Dplug:hw:0,0)
Aborted by signal Interrupt...
The arecord output tells us that the maximum sampling rate supported on my integrated audio card is 48000Hz (or 48kHz). You may have to experiment with different sampling rates to get the Warning message.
There is some additional information on USB mics on the Audacity site.
A message or post is the smallest unit in a discussion. A threaded discussion (or thread) is a series of posts related to the same topic or subject.
A post's layout can be set using the Nested/Flat link in a VoxForge forum (located on the top right hand corner of a thread) and can be:
Example of flat structure:
Nested structure:
Flat/nested choice often determines the way people discuss. In the flat layout there is only one "path" - that is why it is sometimes called "linear".
Nested layout offers more freedom, more digressions and more paths in the discussion but it is more difficult to spot new posts (unless you use RSS feed or watch the thread).
LibriVox
Librivox audio is public domain (they use a Creative Commons Public Domain Dedication). They use ebooks obtained from Project Gutenberg. Many Project Gutenberg ebooks are also public domain (not all). To make sure that they only release audio readings of public domain texts, Librivox relies on Project Gutenberg's legal work to assure Copyright status of their books.
Project Gutenberg
The Acoustic Model creation process requires that we segment any user
submitted audio (and its corresponding text transcriptions) into 5-10
second speech audio snippets. But, in doing so, we would contravene
the Gutenberg Project's Trademark licensing terms if we kept any
references to Gutenberg in the eText that accompanies the speech
audio. For this reason, we need to remove all references to Gutenberg
in any speech audio and text submission made to VoxForge.
To distribute Project Gutenberg e-texts with the "Project Gutenberg" trademark name, you must follow some licensing provisions that include a requirement that the text not be broken up in any way, and pay a licensing fee. If you don't use the Project Gutenberg Name, and delete any reference to it in the text, you can distribute the text in any way you see fit.
For example, for the Herman Melville book 'Typee', the Librivox audio is public domain (it uses the Creative Commons Dedication). The text of the Gutenberg Typee ebook has the following "license". It says the following in the intro:
ABOUT PROJECT GUTENBERG-TM ETEXTS
This PROJECT GUTENBERG-tm etext, like most PROJECT GUTENBERG-
tm etexts, is a "public domain" work distributed by Professor
Michael S. Hart through the Project Gutenberg Association at
Carnegie-Mellon University (the "Project"). Among other
things, this means that no one owns a United States copyright
on or for this work, so the Project (and you!) can copy and
distribute it in the United States without permission and
without paying copyright royalties.
Then it goes on to say:
Special rules, set forth
below, apply if you wish to copy and distribute this etext
under the Project's "PROJECT GUTENBERG" trademark.
So basically it says that no one owns copyright on the written text of this book in the US (and likely most other jurisdictions), and you can copy and distribute as you please. But, if you want to copy and distribute the book along with references to the Gutenberg TradeMark, then you need to follow some special rules.
Further on in the document it says:
DISTRIBUTION UNDER "PROJECT GUTENBERG-tm"
You may distribute copies of this etext electronically, or by
disk, book or any other medium if you either delete this
"Small Print!" and all other references to Project Gutenberg,
This clarifies what you need to do if you want to distribute the ebook without any restrictions - basically you delete the 'license' and the Gutenberg trademarks.
It then goes on to elaborate the conditions you must follow if you do want to distribute the text with the Gutenberg trademarks:
or:
[1] Only give exact copies of it ...
[2] Honor the etext refund and replacement provisions of this
"Small Print!" statement.
[3] Pay a trademark license fee to the Project of 20% of the
net profits ...
Note: I am not a lawyer, and this is not a legal opinion.
A nice overview of speech recognition by Professor Don Colton: Automatic Speech Recognition Tutorial
from an article on DZone: Introduction to Synthetic Agents: Speech Recognition - Part 1
Technically, speech recognition extracts the words that are spoken whereas voice recognition identifies the voice that is speaking. Speech recognition is "what someone said" and voice recognition is "who said it". The underlying technologies do overlap but they serve very different purposes.
Full Mirror of VoxForge site (thanks to Coral Cache):
Partial Mirrors (only VoxForge Speech Submission app & some supporting docs):
You need Javascript enabled on your browser in order for the upload link to appear on the submission page.
Hello World Decoder QuickStart Guide - is a tutorial to help you recognize audio files with spoken audio into text!
From the site:
Contents
The easiest way to record Voxforge Prompts with Audacity is to open the prompts file into its own browser window or tab. Then maximize your browser to take up all your screen.
Next, open Audacity into a smaller window - almost the same width as your browser but only 1/4 the height - see image below:
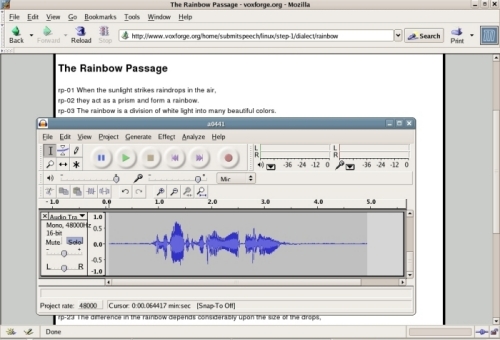
Use the top of the Audacity window as a ruler to highlight the line that you are reading. When you finish one line, use your mouse to move the Audacity window down one line.
When you get too close to the bottom of your screen, just scroll up the prompts file in your browser window, and continue recording your prompts.
From their website:
Version 1.1.0 of the open source transLectures-UPV toolkit (TLK) is out now for Linux and Mac, featuring new high-level scripts to make it simpler to run speech recognition tasks. Download TLK and try the new tutorial!
TLK, the transLectures-UPV toolkit, is the open source automatic speech recognition (ASR) software developed at Universitat Politècnica de València. It comprises a set of command-line tools for building, training and applying acoustic models that can be used, among other things, to generate transcripts for video lectures. Indeed, it is the software running behind the transLectures automatic subtitling system in the UPV’s Polimedia video lecture repository.
Phoneme Coverage Prompts are prompts designed to provide good coverage of all the different phonemes in the English language.
From the Audacity Digital Audio Tutorial :
The main device used in digital recording is a Analog-to-Digital Converter (ADC). The ADC captures a snapshot of the electric voltage on an audio line and represents it as a digital number that can be sent to a computer. By capturing the voltage thousands of times per second, you can get a very good approximation to the original audio signal:

Each dot in the figure above represents one audio sample. There are two factors that determine the quality of a digital recording:
Sample rate: The rate at which the samples are captured or played back, measured in Hertz (Hz), or samples per second. An audio CD has a sample rate of 44,100 Hz, often written as 44 KHz for short. This is also the default sample rate that Audacity uses, because audio CDs are so prevalent.
Sample format or sample size: Essentially this is the number of digits in the digital representation of each sample. Think of the sample rate as the horizontal precision of the digital waveform, and the sample format as the vertical precision. An audio CD has a precision of 16 bits, which corresponds to about 5 decimal digits.
Higher sampling rates allow a digital recording to accurately record higher frequencies of sound. The sampling rate should be at least twice the highest frequency you want to represent. Humans can't hear frequencies above about 20,000 Hz, so 44,100 Hz was chosen as the rate for audio CDs to just include all human frequencies. Sample rates of 96 and 192 KHz are starting to become more common, particularly in DVD-Audio, but many people honestly can't hear the difference.
Higher sample sizes allow for more dynamic range - louder louds and softer softs. If you are familiar with the decibel (dB) scale, the dynamic range on an audio CD is theoretically about 90 dB, but realistically signals that are -24 dB or more in volume are greatly reduced in quality. Audacity supports two additional sample sizes: 24-bit, which is commonly used in digital recording, and 32-bit float, which has almost infinite dynamic range, and only takes up twice as much storage as 16-bit samples.
Here are some additional articles that provide more information on sampling rate and bit depth (i.e. bits per sample):
the Voxforge lexicon file contains special entries for SENT-START and SENT-END. If you plan to use a non-Voxforge dictionnary, be sure to add these entries:
SENT-END        []              sil
SENT-START      []              sil
When the commercial SRE providers say that you need to 'tune' the SRE to your location, they are saying that you (or their consultants) need to either:
A Codec is a device or program capable of performing encoding and decoding on a digital data stream or signal.
It typically refers to a capability of voice recognition systems on a personal computer that lets you select menus and other functions by speaking the commands into a microphone.
A Dialog Manager is one component of a Speech Recognition System.
Telephony and Command & Control Dialog Managers
A Dialog Manager used in Telephony applications (IVR - Interactive Voice Response), and in some desktop Command and Control Application, assigns meaning to the words recognized by the Speech Recognition Engine, determines how the utterance fits into the dialog spoken so far,and decides what to do next. It might need to retrieve information from an external source. If a response to the user is required, it will choose the words and phrases to be used in its response to the user, and transmit these to the Text-to-Speech System to speak the response to the user.
Dictation Dialog Manager
A Dictation Dialog Manager will typically take the words recognized by the Speech Recognition Engine and type out the corresponding text on your computer screen. It may also have some Command and Control elements, but these are usually limited to the types of commands typically used in a word processing program. It usually responds to the user using text (i.e. it might not use Text to Speech to respond to the user).
Examples
Examples of Telephony Dialog Managers include:
Examples of Command & Control Dialog Managers:
Examples of Dictation Dialog Managers, with Command & Control elements, would be:
You can also write a domain specific application to perform Dialog Manager-like tasks using a traditional programming language (C, C++, Java, etc.) or a scripting Language (Perl, Python, Ruby, etc.). For example:
A Dictation application uses Speech Recognition to translate your speech into written text on your computer.
A Dictation application lets you speak into a microphone attached to your computer, and have the text print out on your computer screen. It can recognize a larger number and variety of words. It can recognize arbitrary phrases with words in any order.
This is different from a Command and Control application which also uses speech recognition but is limited to controlling your computer and software applications by speaking short commands. Here, the vocabulary that the speech recognition engine can recognize is much smaller than in dictation, and is limited to a small set of words and predefined phrases.
Commercial dictation systems usually include a command and control system.
A Speech Recognition Grammar sets out all the acceptable words and phrases that a user might say at a particular point in a dialog with a Speech Recognition System. A Grammar file is used in Desktop Command & Control or Telephony IVR (Interactive Voice Response) Speech Recognition applications.
A simple grammar (in HTK format) might look like the following:
$name = [ STEVE ] YOUNG| [JOHN] DOE;
( START (PHONE|CALL) $name) END )
Basically this tells the Speech Recognition Engine to recognize the following utterances (note that the vertical bar in the grammar denotes 'or', and the contents of a set of square brackets indicates an optional utterance):
Any other utterance is ignored by the Speech Recognition Engine, which usually returns an 'out of grammar' error. So the following utterances would be rejected by the Speech Recognition Engine:
For additional information, see these links:
W3C's Speech Recognition Grammar Specification (used with VoiceXML).
A hertz (symbol: "Hz") is a unit of frequency. The sampling rate, sample rate, or sampling frequency defines the number of samples per second taken from a audio signal to make a digital representation of that signal.
One hertz means one cycle per second; one hundred hertz means one hundred cycles per second; one thousand hertz (or a kilohertz - symbol "kHz") means one thousand cycles per second.