VoxForge

VoxForge
Before you begin, you need to make sure that the room you are recording in is as quiet as possible. In addition, make sure you turn off you speakers while recording - to avoid acoustic feedback in your audio files (more information).
Next you need to adjust your microphone for optimal pickup of your voice.
If you have a headset microphone, this should be easy to do. Your microphone should be a bit to the side and below your mouth (so the microphone won't pick-up your breathing), and no more than a half inch (1-2 cm) away (more information).
Now you need to test your recording levels.
Start Audacity.
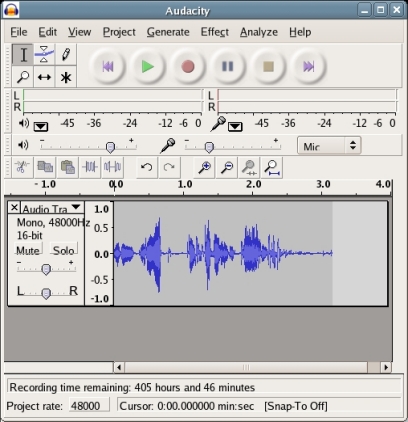
Make sure your microphone volume in Audacity is set to 1.0.
Then click Record (i.e. the red circle button) and begin speaking in your normal voice for a few seconds, and then click Stop (i.e. the yellow square button).
Look at the Waveform Display for the audio track you just created. The Vertical Ruler to the left of the Waveform Display provides you with a guide to your audio levels. Try to keep your recording levels between 0.5 and -0.5, averaging around 0.3 to -0.3. It is OK to have a few spikes go outside the 0.5 to -0.5 range, but avoid having any go beyond the 1.0 to -1.0 range, as this will generate distortion. If necessary, adjust Audacity's microphone volume to keep your audio within the proper ranges (more information).

In Audacity, you set the Project Sampling Rate and Sample Format in your Preferences (under the 'Edit' menu selection). Click the 'Quality' tab:
Next click the 'Audio I/O' tab, and then:
Then click the 'File Formats' tab, and then
Note: Please only submit audio files in an uncompressed format such as WAV or AIFF or lossless compressed format such as FLAC.
Click OK to save your settings.
Now you need to exit and re-start Audacity to make these Project Setting changes active. Look at Project rate selector on the bottom left hand corner of the Audacity window, make sure it says 48000.
Step 2 we created a prompts.txt file that can now be used to guide you on which words you need to record for your individual speech audio files.
Each line of the prompts.txt file corresponds to the transcribed contents of one audio file. The first column contains the name of the audio file, and the following columns on the same line contain the text transcriptions of what is recorded in the audio file, see below:
|
*/sample1 DIAL ONE TWO THREE FOUR FIVE SIX SEVEN EIGHT NINE OH ZERO |
To
begin, you should not have any tracks displayed in the Audacity
window. If you do, click the x icon at the top left of the audio
track display (or hit ctrl-z as many times as is required to remove
them; or restart Audacity). If you don't Audacity will happily
record your new track, and leave your old track untouched, and when you
export your audio to a wav file, both tracks will be merged to your wav
file.
Make sure your volumes are set properly, as outlined in the preceding section.
Record you first file by clicking 'Record' in Audacity and saying the words in the first line of your prompts.txt file:
DIAL ONE TWO THREE FOUR FIVE SIX SEVEN EIGHT NINE OH ZERO |
Speak normally - not too slow or too fast - and clearly. Pause slightly before you begin speaking and leave a short pause after you have completed (i.e. half a second pause before and after you speak). Remember not to breath out until you have clicked stop - most mikes pick up breathing noises.
Click the 'Stop' icon when you are completed.
Review your waveform to ensure that highest and lowest peaks of your recording is between 0.5 and 1.0 in the upper range and the lower range is between -0.5 and -1.0. If they are, then listen to the file (press 'Play' in Audacity) to make sure your pronunciation is clear and that you do not hear any non-speech noises (i.e. breathing noises, lip smacking, or background noises, ...). If there are any problems, hit ctrl-z and re-record your file.
Create a new folder in the 'voxforge' directory in your home directory and call it 'train', then create a sub-folder in your 'train' directory called 'wav'.
If the file sounds OK then click 'File' on the Audacity menu, then click 'Export As Wav' and save it as the name of the file listed in your prompts.txt file ('sample1' in this case) in the '[your home directory]/voxforge/train/wav' folder you just created.
Repeat the same process for each line in your prompts.txt file. When you are completed, you should have a series of audio files corresponding to all the files listed in the first column of the prompts.txt file your 'voxforge/train/wav' folder.