VoxForge
VoxForge
If you are using Linux (we will be using the Fedora in this example) use the following command to download and install Audacity (as superuser):
$su
Password:
#yum install audacity
Before you begin, you need to make sure that the room you are recording in is as quiet as possible. In addition, make sure you turn off you speakers while recording - to avoid acoustic feedback in your audio files (more information).
Next you need to adjust your microphone for optimal pickup of your voice.
If you have a headset microphone, this should be easy to do. Your microphone should be a bit to the side and below your mouth (so the microphone won't pick-up your breathing), and no more than a half inch (1-2 cm) away (more information).
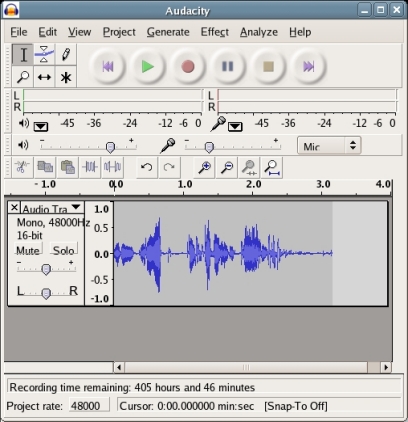
Now you need to test your recording levels.
Start Audacity.
Make sure your microphone volume in Audacity is set to 1.0.
Then click Record (i.e. the red circle button) and begin speaking in your normal voice for a few seconds, and then click Stop (i.e. the yellow square button).
Look at the Waveform Display for the audio track you just created. The Vertical Ruler to the left of the Waveform Display provides you with a guide to your audio levels. Try to keep your recording levels between 0.5 and -0.5, averaging around 0.3 to -0.3. It is OK to have a few spikes go outside the 0.5 to -0.5 range, but avoid having any go beyond the 1.0 to -1.0 range, as this will generate distortion. If necessary, adjust Audacity's microphone volume to keep your audio within the proper ranges (more information).
In Audacity, you set the Project Sampling Rate and Sample Format in your Preferences (under the 'File' menu selection). Click the 'Quality' tab:
Next click the 'Audio I/O' tab, and then:
Then click the 'File Formats' tab, and then
Note: Please only submit audio files in an uncompressed format such as WAV or AIFF or lossless compressed format such as FLAC.
Click OK to save your settings.
Now you need to exit and re-start Audacity to make these Project Setting changes active. Look at Project rate selector on the bottom left hand corner of the Audacity window, make sure it says 16000 (more information).
Each line of the prompts file (which you got in Step 1) corresponds to the transcribed contents of one audio file. The first column contains the name of the audio file. The following words on the same line contain the text you will record in the audio file (see example below):
| vf5-21 So cheer up, and give us your paw vf5-22 This time he did not yap for mercy vf5-23 And the air was growing chilly |
Record your first audio track by clicking Record in Audacity and saying the words in the first line of your prompts file (skipping the name of the file). With our current example you would say:
So cheer up, and give us your paw |
Leave a one second pause before and after you speak (these pauses will help in determining noise levels in your recordings). Speak normally, not too fast or too slow, and clearly. Speak as you would if you were reading the text aloud to someone else, with appropriate pauses corresponding to the punctuation in the text (if you are unsure how to pronounce a word).
Click the 'Stop' icon when you are completed.
Don't exhale until after you have clicked stop (most people have a tendency to breath out after speaking a sentence) otherwise your microphones will pick up your breath noises.
Review your waveform to ensure that your recording levels are between 0.5 and -0.5, averaging around 0.3 to -0.3. It is OK to have a few spikes outside the 0.5 to -0.5 range, but don't have any go beyond the 1.0 to -1.0 range.
If your waveform looks good, then listen to the track (press 'Play' in Audacity) to make sure your pronunciation is clear and that you do not hear any non-speech noises (i.e. breathing noises, lip smacking, or background noises, ...).
Click here for Tips for Recording VoxForge Prompts with Audacity.
Record your second audio track by clicking Record again (in Audacity) and say the words in the second line of your prompts file. Audacity will start a second track leaving your first track untouched.
Review your waveform and listen to each track before proceeding to the next one. You can select a particular track to listen to by clicking 'solo' on the track menu of that particular track, and then clicking play in Audacity. Remember to click 'solo' again when you are done, to unselect the track.
Repeat the same process for each line in your prompts file, adding a new track for each line.
When you have finished recording all the prompts in the prompt file, then click 'File' on the Audacity menu, and click 'Export Multiple...'. The change the following settings on your 'Export Multiple' window:
Then click 'Export'.
This will generate a series of audio files consecutively named 'vf5-01', 'vf5-02', etc. in your 'train' directory.