VoxForge
VoxForge
The Phoneme Prompts files were adapted from the prompt files contained in the CMU_ARCTIC database, which was originally designed for creating voices for the Festival Text to Speech engine. Since
it is phonetically balanced, we used it to generate prompt files for the creation of the VoxForge Speech Corpus.
From their Wikipedia entry:
Thawte Consulting is a certificate authority (CA) for X.509 certificates. Thawte, (pronounced like "thought"), was founded in 1995 by Mark Shuttleworth in South Africa and is the second largest public CA on the Internet.
Thawte offers free email certificates that can be used sign Java code for use in Java Applets (Richard Dallaway's Java Web Start and Code Signing page provides the details on how this can be done).
If you posted a message to the VoxForge Submission system, it might not display immediately for a couple of reasons:
All content on the VoxForge server is cached, and it may take 1 or 2 minutes for a newly submitted message to show up in the forum; or
If you are not logged on to the VoxForge site, then you might need to clear your browser cache.
There are no browser cache issues if you are logged on to the VoxForge site.
You need to make the script file executable using the chmod command or Nautilus:
chmod u+x <filename>
changes permission of the named file to executable.
Nautilus
right click the file, click 'properties' on the right-click menu, then select the Permissions tab, and then put a check next to the Execute box on the owner line.
HTK seems to take much less time to compile a set of smaller audio files (with no more that 10-15 utterances) rather than one large transcribed audio file (even if your transcribed utterances have start and end time information included).
Speech Recognition Engines need Acoustic Models trained with speech audio that has the same sampling rate and bits per sample as the speech it will recognize. The different speech mediums have limitations that affect speech recognition.
For example, for telephony speech recognition, the limitation is the 64kbps bandwidth of a telephone line. This only permits a sampling rate of 8kHz and a sampling resolution of 8-bits per sample. Therefore, to perform speech recognition on a telephone line, you need Acoustic Models trained using audio recorded at an 8kHz sampling rate with 8-bits per sample. VoIP applications usually have the same limitations since they allow interconnection to Public Service Telephone Network (PSTN).
For desktop Command and Control applications, your PC's sound card determines your maximum sampling rate and bits per sample, and the power of your CPU determines what kinds of acoustic models your Speech Recognition Engine can process efficiently.
Speech Recognition Engines work best with Acoustic Models trained with audio recorded at higher sampling rate and bits per sample. However, since current hardware (CPUs and/or sound cards) is not powerful enough to support Acoustic Models trained at higher sampling rates and bits per sample, and telephony applications have bandwidth limitations (as discussed above), a compromise is required. VoxForge has decided that the best approach (for now) is to collect speech recorded at the highest sampling rate your audio card support, at 16-bits per sample, and then downsample the audio to sampling rates that can be supported by the speech medium
For example, for Command and Control applications on a desktop PC, you can downsample the 48kHz/16-bit audio to 16kHz/16-bit audio, and create Acoustic Models from this. This approach permits us to be backward compatible with older Sound Cards that may not support the higher sampling rates/bits per sample, and also permit us to look to the future so that any submitted audio at higher sampling rates/bits per sample will be usable down the road when Sound Cards that support higher sampling rates/bits per sample will become more common, and processing power increases.
For Telephony applications, to create Acoustic Models from audio recorded at a sample rate of 48kHz with 16-bits per sample, you must first downsample the audio to a sample rate of 8kHz/8-bit per sample, and then create an Acoustic Model from this.
Some VoIP PBXs, such as Asterisk, actually represent audio data internally at 8kHz/16-bit sampling rates, even though the codec used might only support 8kHz/8-bit sampling rates. Therefore VoIP PBX's like Asterisk can use Acoustic Models trained on audio with8kHz/16-bit sampling rates.
From Wikipedia:
Different newline conventions often cause text files that have been transferred between systems of different types to be displayed incorrectly. For example: files originating on Unix or Apple Macintosh systems may appear as a single long line on some Windows programs. Conversely, when viewing a file originating from a Windows computer on a Unix system, the extra CR may be displayed as ^M at the end of each line or as a second line break.
Therefore, depending on your operating system, you might need to convert a text file from one format to your OS format.
On Linux use the dos2unix command to convert a text file from MS-DOS format (or Mac format) to Unix format.
The flip utility can be used for converting Linux/Unix format text files to MAC or Windows/MS-DOS environments.
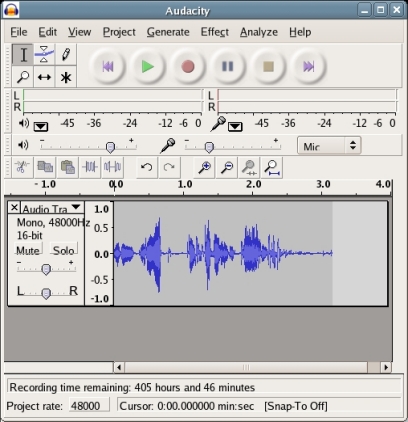
First make sure your microphone volume in Audacity is set to 1.0. Then click Record (i.e. the red circle button) and begin speaking in your normal voice for a few seconds, and then click Stop (i.e. the yellow square button).
Look at the Waveform Display for the audio track you just created (see image below). The Vertical Ruler to the left of the Waveform Display provides your with a guide to the audio levels. Try to keep your recording levels between 0.5 and -0.5, averaging around 0.3 to -0.3. It is OK to have a few spikes go outside the 0.5 to -0.5 range, but avoid having any go beyond the 1.0 to -1.0 range, as this will generate distortion (see image):
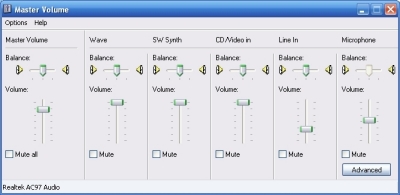
If you have increased your volume in Audacity to the maximum and still are not getting an acceptable sound level in your recording, you may need to either increase the volume settings or turn on the 'Mic Boost' switch in your Windows Master Volume Control utility. This utility located in the Start>All Programs>Accessories>Entertainment menu, and is called "Volume Control".
The Windows Master Volume Control utility controls the volume settings for many things on your PC. Scan across the window and look for your Microphone volume control slider.
|
If your Microphone volume control is not showing up in the "Master Volume" window, click Options>Properties, and select Adjust volume for "Playback" button and select the Microphone box in the "Show the following volume controls:" selection list. Click OK. If your Advanced button is not showing up under your Microphone Volume Control, click the Options>Advanced Controls selection. |
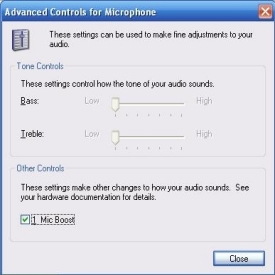
Click the 'Advanced' button under the Microphone Volume Control (see image below):
and then select the '1 Mic Boost' box (see image below):
Hit the ctrl-z key in Audacity (to 'undo' your previous recording) and try recording again.
If the waveform display on your track beyond the 1.0 to -1.0 range (i.e. the waveforms have been clipped off at the top or bottom) your volume is too high. Reduce it with Audacity's microphone volume control, and hit ctrl-z in Audacity and try again. It is better to err on the side of having a lower volume level from a speech recognition perspective - clipped speech sounds distorted.
Once you are satisfied that the volume is acceptable, try playing the file back by clicking Play (i.e. the green triangle button) in Audacity. You will likely need to adjust the Master Volume for your speakers in your Windows 'Master Volume' utility in your Volume Control utility (see image above).
You need to hear your utterances after each recording to make sure they sound OK (i.e. to make sure there are no non-speech noises - like breathing noises). Make sure that your speakers are turned off when you are recording. Hit ctrl-z in Audacity to remove the track you just created.
You can automatically adjust your microphone volume in Windows XP using the Microphone Wizard. This utility located in:
Classic View:
Start>Control Panel>Speech
Category View:
Start>Control Panel>Sounds , Speech, and Audio Devices>Speech
This opens the Speech Properties Window:

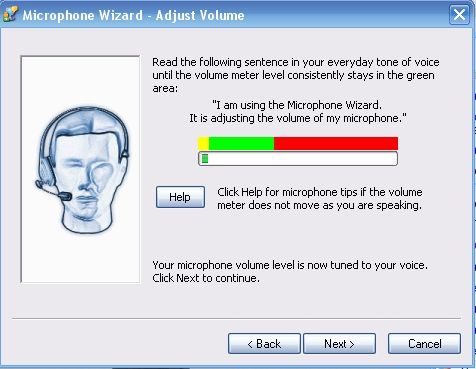
Next, click the "Configure Microphone..." button. The Microphone Wizard window appears next:
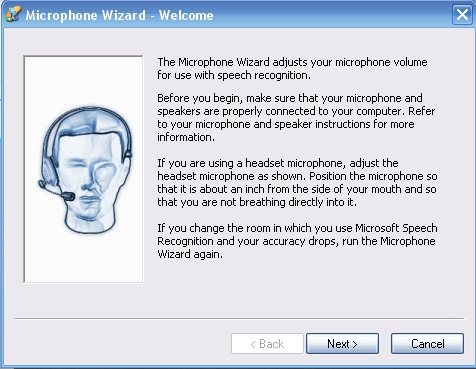
Next follow the instructions to tune your microphone level to your voice:
VoxForge collects speech audio at the highest Sample Rate that your Sound Card can support (up to a Sampling Rate of 48kHz, at 16 Bits Per Sample). You'll need to look at your Sound Card's manual to determine the maximum it supports (see this FAQ entry for more info on your sound card and recording rates). For this example we will assume a 48kHz Sample Rate.
In
Audacity, you set the Project Sampling Rate in your Preferences. First go
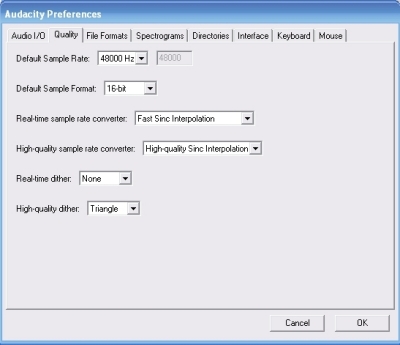
to 'Edit', then select 'Preferences...', next click the 'Quality' tab,
and
then set your 'Default Sample Rate Format' by clicking the up/down
arrows to change it to 48000Hz - the default is usually 44100Hz (see image below).
Still in the 'Preferences...' menu, and still under the 'Quality' tab, click the 'Default Sample Format'. Click the up/down arrows to change it to 16-bit (see image below):
Channels
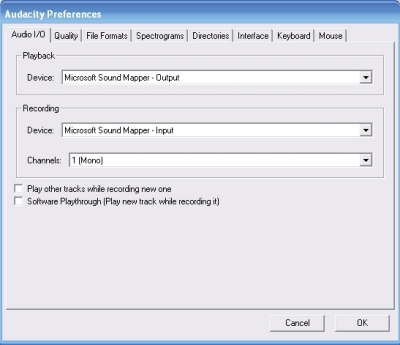
While still in the 'Preferences...' menu, click the 'Audio I/O' tab, and then set your 'Channels' to 1 (Mono), see image below:
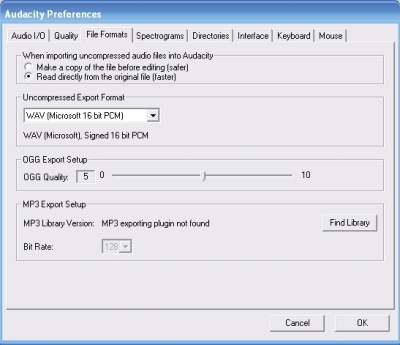
While still in the 'Preferences...' menu, click the 'File Formats' tab, and then set your 'Uncompressed Export Format' to WAV (Microsoft 16 bit PCM), see image below:
Click OK to save your settings.
You can also submit speech using FLAC format.
| Note: Please only submit audio files in an uncompressed format such as WAV or AIFF or lossless compressed format such as FLAC. |
Now you need to exit and re-start Audacity to make these Project Setting changes active. In Audacity, click File>Exit. Restart Audacity by clicking Applications>Sound & Video>Audacity.
Look at Project rate selector on the bottom left hand corner of the Audacity window, make sure it says 48000. If it does, then you are ready to continue. If not, then re-check your Preferences tab to make sure your settings are correct.
To submit audio to VoxForge, You need to make sure you Sound Card and your Device driver both support a 48kHz sampling at 16 bits per sample.
You can use SoundCheck
from
Passmark software. It is proprietary but has a 30 day trial
period.
1. Audio Device Driver - max rates
After you download and install Soundcheck, you can determine the maximum sampling rate and bits per sample of your audio device driver supports by clicking the following in Soundcheck's main menu:
Settings>View Wave Capabilities - Windows
The "Device Capabilities" window will pop-up. Make sure "Select I/O' is set to "Input", and that you have the correct "Device" (if you don't know, use the default). Next, look at the "Formats sound card driver claims to support" section and scroll down to the bottom of the list to see the max rates your audio driver supports.
I have the "Realtek AC97 Audio" Driver installed and the max recording (i.e. Input) rates that it supports are as follows:
----Basic Formats -----
[...]
128.0kHz, stereo, 32-bit - Ye
2. Sound Card - max rates
To confirm that your sound card also supports a 48kHz sampling rate at 16bits per sample you need to record some audio - your voice will do fine for this test.
In the "Sound format" section of Soundcheck's main window, select the following settings:
Requested Sample Rate: 48000Hz (DAT Tape)
Channels: 1 (Mono)
Resolution: 16 bit
In the Data rates (Bytes/Sec) note the values in these fields:
Requested: 96000
Actual In: (blank)
Average In: (blank)
Next, Record (click the circle icon on bottom left of SoundCheck Window) yourself speaking a sentence with no pauses for about 3 seconds. If the value in "Average In" matches the Requested value (by around +-5%), then your hardware supports recording at a 48kHz sampling rate at 16 bits per sample.
I recorded myself saying "this is a test" and got the following values:
Requested: 96000
Actual In: 97901
Average In: 95358 (-0.67%)
I am still looking for an Open Source Solution to determine a sound card's (or USB Mic's) maximum sample rate and bits per sample. Please let me know if you come across one.
Use the following steps to download and install 7-zip:
To set your microphone volume in Windows you need to use the Recording Control utility. This utility located in:
Classic View:
Start>Control Panel>Sound and Audio Devices
Category View:
Start>Control Panel>Sound, Speech, and Audio Devices>Sounds and Audio Devices
The "Sounds and Audio Devices Properties" window appears. Select the "Voice" tab:
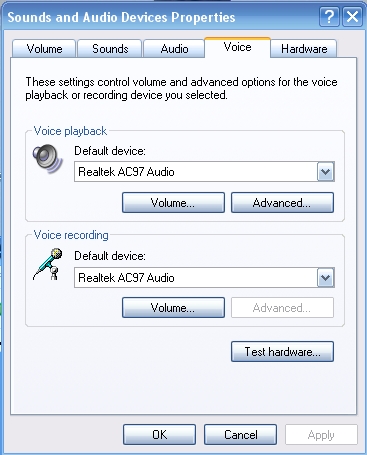
Then click the "Volume..." button.
The Windows Recording Control utility controls the volume settings for many things on your PC. Scan across the window and look for the Microphone volume control slider.
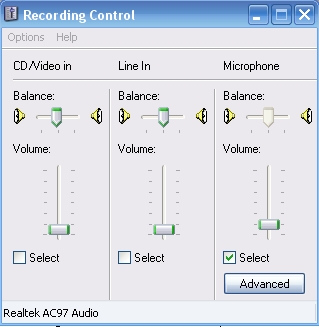
Move the Microphone slider up or down to increase or decrease your microphone's recording volume.
|
If your Microphone volume control is not showing up in the "Recording Control " window, click Options>Properties, and select the Microphone box in the "Show the following volume controls:" selection list. Click OK. If your Advanced button is not showing up under your Microphone Volume Control, click the Options>Advanced Controls selection. |
First make sure your microphone slider is set to it's mid-point. Then click Record in the VoxForge Speech Submission Application and begin speaking in your normal voice for a few seconds, and then click Stop.
Look at the Waveform Display for the recording you just created. Adjust your microphone volume up or down depending on the size of the Waveforms.
If you have increased your volume to the maximum and still are not getting an acceptable sound level in your recording, you may need to turn on the 'Mic Boost' switch in your Windows Recording Control utility.
Click the 'Advanced' button under the Microphone Volume Control (see image below):
and then select the '1 Mic Boost' box (see image below):
Try re-recording your prompt - you might have to reduce your microphone volume to compensate for the Mic Boost.
If the waveforms in the display have been clipped off at the top or bottom, then your volume is too high. Reduce your microphone volume, and re-record some speech. It is better to err on the side of having a lower volume level from a speech recognition perspective - clipped speech sounds distorted. But you also need it to be loud enough such that you can see your speech waveforms in the display (i.e. you should be able to see squiggly lines that correspond to your speech).
Once you are satisfied that the volume is acceptable, try playing the file back by clicking Play .
You may need to adjust the Volume for your speakers. This is located on the Volume tab of the "Sounds and Audio Devices Properties" window. Click the "Speaker Volume..." button on that page, and adjust you speaker volume as needed.
Use the following command to download and install 7-zip:
Please make sure the following files are in your 'train' folder:
Next, using your Windows File Explorer, go to the 'train' folder and right click it. From the right click menu, select '7-zip>Add to archive...'
Name your zip file as follows "[voxforge username]-[year][month][day].zip", and click OK. Your zip file will be added to the parent directory of your 'train' file.